Showing posts with label sculpture. Show all posts

Monday, May 26, 2014

Dragon Vase - finished

Earlier this month, I posted some photos of a dragon vase. And now, I can show you the completed version. I am very, very happy with how he turned out!

Rawr!

Now, in my last posting, you could see how I had a lot more detail and some color from the underglaze. However, one of the risks you take in wood/salt firing is that the colors will burn out (very hot temperatures here) and the salt would degrade any textures you put on it. One friend preferred the back side because you could still see the texture. I, however, am just fine with how it turned out. I got an ash drip on his chin (green glassy beard!) and some drips on his back scales.

And, even though his tail separated from the pot during the drying process, the tail flattened and relaxed against the vase. I'll have to take better photos of the vase soon. He'll be posted on Etsy soon enough.

Sunday, May 25, 2014

More wood fire results from the May 2014 firing


Here is what the kiln looked like after I helped break down the door. Oooh, so much shiny! I was a very happy potter. And you can see my dragon vase up in the corner. Perfect spot for him! I'll post about him later.


Here's my baby dragon. He was sitting by some lovely cups and just looks so sweet. He's going to be a part of my personal collection.


A better picture of the baby dragon.


Here's my fish. You might recall (or not) that I broke his fin off. Well, the magic of E6000 glue helped me reattach the fin. I think I'll add some gold leaf in the broken area. He'll also be a gift to a girl who gave me one of her pieces. Not sure how to display this guy. His hole for a stand got covered up too.


And a frog. I really like how both the fish and the frog look like they just came out of the water.

Saturday, May 24, 2014

Wood fire results part 1

So, while I was in DC, there was a wood/salt firing. Fortunately, I have good friends who took my pieces and loaded them into the kiln. I owe them a big favor as my pieces turned out great. Above is a dragon sculpt that was originally going to hold glass beads. But, the hole got closed over in the firing. Also, I wasn't too happy with the eyes... too bulging. And so, I decided to give it away.

 Still, he got some lovely ash coloring (the green glassy parts)

And even an ash drip/tear on one of his wings.


And here is the happy owner. I gave the dragon to Miss A. because she will be helping me out when I'm ready to post more of my pieces on Etsy. Just need to make more. Always happy to see happy owners of my work.

Tuesday, May 13, 2014

Fish Plate 2 and the Art of Letting Go

 A few months ago, a fellow potter who is much more experienced than I am and also much bigger in size, showed me how to throw large platters. He demonstrated with one whole bag of clay, 25 lbs. As for me, I decided to go with half a bag. I threw two platters and took about 3-4 days to recover physically haha. The platter above is about 11lbs of clay. Now, I did try to wire off the platter, but the wire rose up as I was trying to slide it along the bottom and I managed to slice up a bit of the bottom. I cursed aloud, slipped the wire along and then did my best to smooth out the damage. I thought I was successful... we shall see.

 I decided to sculpt a fish on it. A few weeks earlier, I sculpted a fish and used underglaze on it. It was successful and turned out quite nicely. So, I was eager to replicate the success and do another fish. This time, I decided to make the fins out of Pier porcelain (the platter is made of Smooth Sculpture clay). I know that Pier porcelain and Smooth Sculpture have different  shrink rates, but I figured,  "What the heck? Let's see what happens."

 Here's the completed sculpt. Body and face made of Smooth Sculpture.

 Detail... I loved how this turned out.

And then, I took the plate upstairs into my condo to let it dry there. I thought that it had dried enough that it wouldn't matter what I set it upon to dry... Since my cats like to walk on my dining room/work table, I decided to put it on my kitchen countertop. Wrong move... My countertop is made of Corian. I don't think it allows for 'movement'... So, the below happened.

A small crack that went right through the fish and the platter.


Which then became a large crack that went all the way through.

To the end result... cracked in half.

Now, I posted these photos on Facebook, and a number of well meaning friends gave me suggestions on how to fix it or how to finish it. And I did consider it for a while, but did not want to spend the time to finish it. I just wanted to toss it. I talked to the friend who originally taught me how to throw the platter and another potter friend what they thought I should do. Both agreed with my idea to just toss it and yes, they did tell me what I wanted to hear. Honestly, as a potter of many years, sometimes, it's just easier and faster to let go of your mistakes and start again. And that is what I did.

After a few days of mourning, I eventually tossed the plate into my recycled clay bucket. Bashed it to pieces and felt much much better.

Sometimes, it's just better to let it go.

No, I will not sing the song from the movie to anyone. Although, I might consider singing it in Japanese.

Monday, May 12, 2014

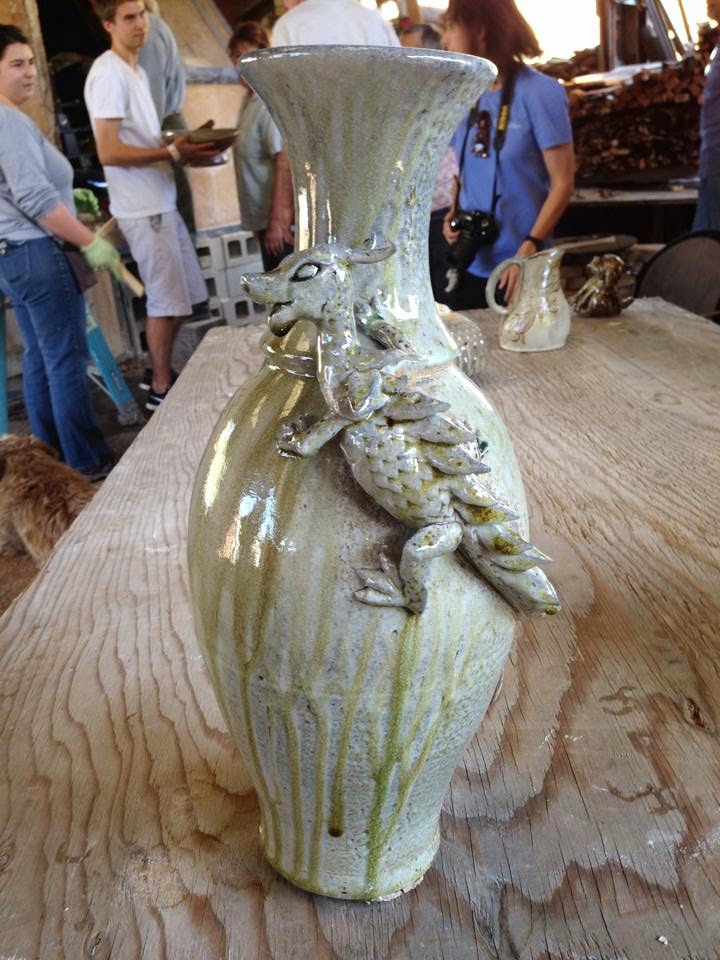
Dragon Vase

So, I have a commission to do a 37 cm tall vase (a little over 14 inches tall) and I decided that I should do some practice stacker pots to make sure that I can still throw tall (I've been throwing so many mugs lately!). And the vase you see is the result.

Also, there is a wood salt firing coming up next weekend. I wasn't sure I would complete much of anything in time, but I sure was going to try. A friend had given me 3 bags of Danish White with sand clay, and since that clay takes color very well in wood firings, I knew what clay to use. Just needed to make something.

Made the vase. I really liked how it turned out. The main body is made up of two cylinders that were merged and blended and shaped together. The neck and top part of the vase is a separate cylinder that I attached after trimming. I was very pleased with it. Now, my original idea was to sculpt a dragon on the vase.  But, since I liked the shape of the vase so much, I posted a photo and asked my friends whether or not I should add a dragon. Although a few people said "no", a great majority said "DRAGON!"

And so... here you go... a dragon vase:


RAWR!

Now, the dragon is made of the same clay as the vase. I decided to add some underglaze to the dragon so that it will look different from the rest of the vase when it is fired. Remember, wood fired pieces usually get color from the type of wood you use in the firing. And although you may not get uniform colors, the results can be unexpected. By underglazing the dragon, I will add a bit of control on the end result. I will definitely post photos when it is completed.


And finally, here is a photo of me underglazing my dragon. Photo taken by a friend.

Monday, May 5, 2014

I am back! - Fish Plate #1

Well, actually, I never left. I just neglected to post on this blog since last June. So, let's catch everyone up.

The kiln I posted about in June was returned. It just wouldn't get to cone 6 as was advertised. So, I returned it.

In the fall, I started to make Minion mugs from Despicable Me and was busy making a ton of those for Christmas. Let's just say that I did not charge enough at the start. However, I was able to pay some bills and make over $300 on those mugs. I also made a number of Totoro mugs.

Thankfully, the number of Minion mugs has decreased. Also, thankfully, I received a number of commissions that kept me busy til about now. I still have a few left to fulfill, but they are not as numerous as before.

So, what have I been up to? There was a bout of naked raku pots with water color. I'll do a post about that later this week - and those were done last year. I do plan to make more and might have a new one by the end of this week. I've also been throwing platters... some have been really big. Unfortunately, my first big platter cracked in half. More about that later too.

Here's the one I'm proud of right now:

This platter was made from some left over clay. It was a bit wobbly, but around 12 inches wide at the time of throwing... I had been looking at some really pretty photos of colorful betta fish shot with black backgrounds. The photos were absolutely stunning and I decided to do a sculpt.

After I finished sculpting it, I really had no idea how to finish it. On the one hand, it is pretty much a decorative plate. I poked holes behind the tail of the fish to insert a wire for hanging the plate on the wall. I also wanted to make sure that the colors were really bright and contrasting with the black background. In the end, I decided to try underglazing the fish and see what would happen.


Here's the result. I hand painted the clear glaze on the fish and the glossy black glaze on the plate (over the black underglaze). I do need to practice the application of glazes to make it a bit more even. However, I do like how it turned out. The current price for this plate is $225. I do plan on raising the price if I put it on ETSY or take it to a show. But, for anyone reading this blog, if you want this plate, drop me a line. I'm happy to ship it anywhere (for the price of the plate and shipping/handling, of course).

Lots more to share in the upcoming weeks. To see work in progress, it's best to follow my facebook page : Spinning the Clay Fantastic.

See you soon!

Wednesday, October 19, 2011

Skellie girl sculpture


Here's the Skellie girl that I sketched out before. I had to make some changes in order for there to be stable, especially around the neck.

It's a fairly small sculpture.

 I think I will fire it to cone 10 and then I will use acrylic paint on it.

 Here's the bluebird and a close up on her hand.

A close up of her face.

I have another skellie girl sculpture in mind that I'll probably work on tonight.

Tuesday, October 11, 2011

Gandalf statue part 2


Here he is, all put together. I think I could have added some detail under his beard to show the neckline of his robes. Still, I am pretty happy with how he turned out. And his hands make me really happy.

The only thing I am concerned about is the connection point of his staff to his hands. I think there is potential for breakage on his arms in general. We shall have to see. Right now, he's in the process of drying slowly. I think I'll keep him drying until right before Thanksgiving. That's when we are firing next. Survive, Gandalf, survive!

Saturday, October 8, 2011

Gandalf statue


I worked on the Gandalf statue tonight. He now has a head and a hat. I'm actually quite pleased with how he's turning out. This is the first time I've sculpted a male. I think I've done a better job on him than I have on the ladies I've made. Maybe this is a sign for me to do more male sculptures.


Here's a close up of his face. You can't really see the age lines I've put in his face. The flash sort of washed it out.


Here's his profile from one side.


And his profile from the other side.

Now, I just have to figure out his arms. I do know that I want his left arm upraised and I think I'll have his right arm bent and curled in over his stomach. The left arm could cause issues with sagging or just plain falling off if I'm not careful in how I attach it. Hopefully, I will get this done this week.

Wednesday, October 5, 2011

Gandalf

A few years ago, I was very much into the Lord of the Rings movies. I made a candle holder that was carved with a pattern similar to Gandalf the White's staff. My aunt bought the candle holder.

A few months ago, Aunty came to my place, looked at my sculptures and said, "You have to make me a Gandalf to go with my candle holder."

So, a few weeks ago, I made the base for the sculpture. Last night, I added wrinkles to the base. Now, I have to add the head and arms and such. That will be this weekend.

Sunday, August 28, 2011

Latest Sculpture

August was not a very productive month for me, mostly because I was in Hawaii for the first two weeks of the month. However, I came back inspired and ready to make more stuff!

The Knitting Room was running out of yarn bowls, so I made about 2 and a half bags worth of stock. Unfortunately, of the 14 I made, I've lost 3. Ah me...

I've also been accepted into the Alternative Press Expo, so I made a few more plates to paint. Egad, where does the time go?

I threw 6 plates, one squared bowl and 3 more yarn bowls. Unfortunately, they were too wet to trim today, so I got to sculpt. Yay!

I threw the body of this sculpture almost 3 weeks ago and today was the first time I got to work on it. I'm using the Dark Brown clay and will add a celadon glaze over it once it's done. For the face, I think I might use a different clay (BHC which is kind of a warm honey colored clay body when completely fired). Should be fun.

I have really enjoyed making the folds of the dress look like the trunk of the banyan tree, so I'm continuing with that sort of look. I'm looking forward to adding some interesting details on this one.

For my next sculpture, I'm actually going to branch out and try to make a male figure. My aunt would like a Gandalf like sculpture, so that is what I am going to go for.

Tuesday, February 15, 2011

I'm back!

So, I did take some time off right after the Christmas sale and then, I decided to do some fun stuff first. I've also been working on some new work for the wood soda kiln. I made 4 wall hangers and 2 vases for the last firing at the end of January. They turned out great! Pictures to come.

But, first the fun stuff. Here is a lizard/dragon jar.


And my latest sculpture. it's female. I'm kind of happy with some of the folds. I actually feel like I got some right. But once, I had that feeling, the next fold just didn't seem to work as well.

Here's the back side.


I'm also working on stackers for some future wood soda firings. I didn't really care for the shape of this one, so I added a heart cut out to it. It's hard to fit it back into the cutout if the shape isn't completely symmetrical. But, I managed to make it work.


More wall hanging vases. This time, I threw the upright. Tonight, I will head back and 'throw' trim the bottoms to get that nice closed shape. Let's see if this works better than the throwing upside down type.

Wednesday, March 10, 2010

The beginnings of the Mermaid

There you go. The beginnings of the mermaid sculpture. That's her tail on the right. I really need to round it out more to give her a more organic feel... The other parts will be her body. Oh, and the flipper part of her tail hasn't been added yet.

In other news, I'm really falling behind in the sake cup production. I have 75 made. 4 were glazed as samples to send to my cousin so he and his bride could decide on colors. Now, I have to make about 75 more (the total is down from 200 to 140. BUT, it's good to make extras.)

So, I hope to do that this weekend.

Wednesday, February 24, 2010

The beginnings of a new sculpture

I ride Caltrain to work 4 days a week. This leaves me a lot of 'dreaming' time. Usually, I take a nap. However, today, a vision of a mermaid came to mind. I think I'm going to have to try to sculpt it... This one will be wider than tall, but still I want her to be on a rather large scale.

I've also got some sketches for another sculpture. I doubt I will throw the body as I have been doing. This one might be a viney blobby type of sculpture. Will see how they come about.

Thursday, January 14, 2010

New Sculpture begun!

My goal for this year is to sculpt at least one piece each month. I'm slightly ahead of the game in that I have finished a swan/bird boat and have a dragon boat in the process of being made. I also have a new figure sculpture in the works.

I apologize but I don't have pictures of it yet, but I do have a story.

Tuesday night is my pottery night. This past Tuesday, I went early because I knew I wanted to start a new sculpture and I wanted it to be fairly big ( 2- 3 feet tall) by the time I was done. In order to get the height I wanted, I would have to stack cylinders on top of one another. So, from 6 - 8:30, that's what I did. I threw 4 cylinders. The first 3 were around 5 -5.5 lbs each. The last one was about 2 lbs. Threw the base, heated it up, put it off to the side. Threw the second cylinder, matched the top width of the first cylinder, heated #2 up, put it off to the side. Put #1 back on the wheel head, scored the top and added slip. Inverted #2, placed it on top of #1, sealed the seam, separated it from the wheel, smoothed the seam and pulled up the thick bottom (now top of the combined cylinder). Repeat steps with lumps of clay 3 and 4.

I had a decent looking cylinder. Pretty nicely gradated and formed so that my sculpture had hips and a waist and the beginnings of a chest.

BUT

Then my foot slightly touched the pedal of my wheel. It depressed really quickly to maximum speed, my cylinder spun and wobbled. I slammed my foot on the pedal to stop it which made the wheel spin faster for a few seconds. My cylinder decided to imitated a helicopter and took off. The bat rose up off of the pins, hit the spill pans and finally came to a rest as my cylinder of clay flopped over.

Sigh... It happens. And when it does, you just start again and don't let it stop you.

I made a new body with the remains of the first. However, by this time, the clay was a bit drier and my arms were much more tired. The second body isn't as tall as the first, but it's got a lot of potential.

Tonight, I went back to the studio and realized that the body isn't as heavy as I thought it was. Thank goodness. The thrown part stopped right under the breastbone, so tonight, I added the rest of the chest and closed it up at the top to indicated the shoulder line.

Pictures next week of the sculpture.

Will try to take pictures of the dragon boat when it is done.

AND I started throwing 200 sake cups for my cousin's wedding. 12 of 200 are thrown. Will be throwing a bunch more this weekend. (Oh, wedding is in May. I've got a little bit of time hehe).