A friend on Facebook linked a page of
modern teapots. I saw them and said: I can make that one in the shape of a bullet with a handgun handle as the teapot handle and the barrel as a spout! He said that he would pay for something like that. Well, with my sale coming up and my idea to have a sort of fairy land theme for my upcoming sale, I decided to wait on making the bullet/gun teapot.
Then, his girlfriend writes: how about the green one? I asked: the snail one? I want to make one of those! And so, I made some teapots. One is a dragon because I love dragons (almost as much as I love cats) and the other is my attempt at a snail teapot. It needs to be underglazed a nice light green and you really can't see the tail that balances it in the back, but I'm sort of ok with it. I need to work on the spout part of the snail teapot. But, until I make the next one, here ya go...

Dragon teapot says: Ahhhhhhhh

I threw the body, spout and lid. Pulled the handle. Waited a few days for it to dry enough. Because it's been so cold, things are taking forever to dry! The spout looked like a regular bottle at the start. I sliced the bottom at an angle to match the teapot body. Then, for the spout, I cut the top parallel to the table top. I think it makes a nice angle. Added the dragon upper snout, eyes, horns, lid handle and other spikes and front claws... no, he does not really have arms or back legs. I will be carving in an indentation to indicate the back haunches. And I used a v-shaped tool to cut in all the scales.
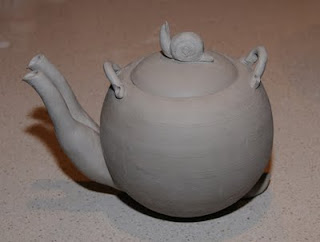
I like the little snail knob for the lid and I'll be using a bamboo handle for this one. I'm not sure about the spouts or how they will pour. We'll see when it's all fired.
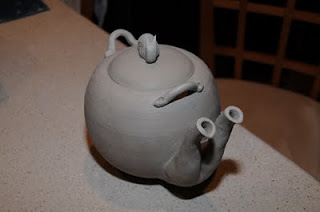
As you can see here, the spouts are not perfectly even or matching. Will have to work on that...
Will try to post pictures of the finished kitty teapot next time.


 Phew! No more Captain Picard sculptures!
 These are done and drying so I can hopefully get them into a Noborigama firing over Thanksgiving.
 It being the holiday season and since I've got a holiday sale coming up, I decided to sculpt some angels. Similar to the tree woman, these angels have thrown bodies and I'll be pulling clay to form wings and their arms. I have one angel done, but that one has a more realistic face. I decided to simplify things for these two because I'm running out of time to get them done AND fired (hopefully they will be bisqued by this Thursday... eeek! running out of time!)
 I made the head for the back angel, stopped and thought, "Jeez! This looks like Jean-Luc Picard! Oh dear, I might have to add some hair hehe.
 These are the thrown pieces I'm working on right now. All are bone dry, but I will be carving into the white circles to thin the walls out a bit. Why do you ask? The clay for the caps is made of Southern Ice porcelain (a clay from Australia that is one of the whitest and most translucent clays out there... expensive too... but sooo worth it to me!). The bottom clay is Smooth Sculpture from Clay Planet, which is the best clay supply store in the area! Ok, so the owners are friends of mine, but hey, I speak the truth!
 A carved Shroom
 Here's the completed kitty teapot. I was having issues with glazing these past few weeks. First the clear glaze was too thin. Then it was too thick. And so, it was still a bit too thick when I glazed it, so it got cloudy on the blue bits.
 The blue bits were supposed to be purple, but they turned out more blue. It really depends on where a piece is in a kiln for certain colors to come out right. Purple is really difficult to get and this underglaze is pretty reliable, but ah well, it happens.
 Dragon teapot says: Ahhhhhhhh
 I threw the body, spout and lid. Pulled the handle. Waited a few days for it to dry enough. Because it's been so cold, things are taking forever to dry! The spout looked like a regular bottle at the start. I sliced the bottom at an angle to match the teapot body. Then, for the spout, I cut the top parallel to the table top. I think it makes a nice angle. Added the dragon upper snout, eyes, horns, lid handle and other spikes and front claws... no, he does not really have arms or back legs. I will be carving in an indentation to indicate the back haunches. And I used a v-shaped tool to cut in all the scales.
 I like the little snail knob for the lid and I'll be using a bamboo handle for this one. I'm not sure about the spouts or how they will pour. We'll see when it's all fired.
 As you can see here, the spouts are not perfectly even or matching. Will have to work on that...
